


Renter Friendly Tile Alternative
- Mary Tee
- May 27, 2021
- 2 min read

Do you have a space in your home that you want to make over but you don't want to (or can't) remove the existing tile? I have a great alternative for you: Peel and Stick Tile!
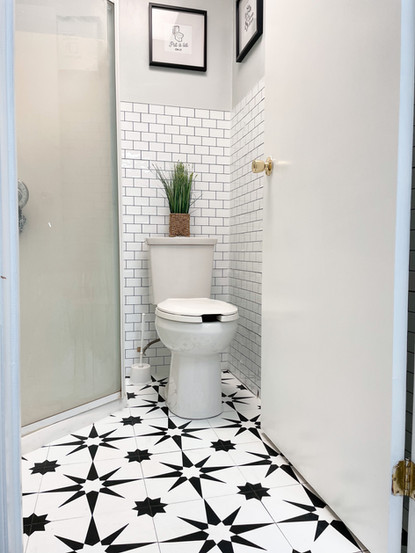
Here are the tiles I used on this project (click on the image):
There are some important steps to take to make sure your tile adheres well and lasts long.
The first and most important step is to make sure you have a clean surface! This will ensure that no dust or grease affects the adhesive on the peel and stick tile.
Once you have a clean surface you can start placing your tiles. For this pattern, I started by laying out all my full pieces first and then worked my way around the pieces I needed to cut.
Peel off the paper on the back of your tile, place on the floor, and firmly push down to ensure that the tile sticks.


For the pieces you need to cut, draw a straight line and use a guide to keep your cut straight. Then score the tile with your utility knife. Next bend the piece where you scored it and the tile will snap. Turn the tile over and cut through the paper on the back. Finally, follow the steps above to place your tile.


For these wall tiles, the application process is identical. To place your first row, cut a straight edge (the package will give you instructions on which side to cut). Lay your first row vertically making sure everything is level.


Once you have your first row applied, you can start on the next. These pieces fit together like a puzzle and are seamless so you can't tell where each sheet starts/stops.


Finally, add caulk to all of your seams for a perfect finish.


It's as easy as that. Look at this amazing before and after:


Make sure to let me know if you found this post helpful. Thanks again for joining me on my DIY journey.