


DIY Bedside Tables
- Mary Tee

- Feb 19, 2021
- 2 min read
Updated: Mar 23, 2021
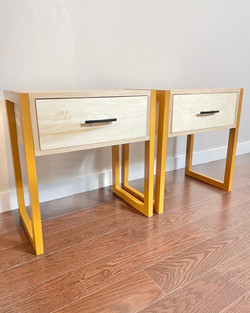
This was such a great project to work on. I had a specific look I was going for in this bedroom and wanted a customized piece to fit the look and feel of the room. This was my first time building bedside tables and my first time building drawers of any kind.
The tables turned out great and I learned a lot along the way.
After I completed the tables and tried to fit them in the space, I quickly realized that the tables were too wide and could not fit. With some quick thinking, I was able to cut down the legs to the right size and guess what? They looked even better!
Sometimes we can get so discouraged by our mistakes, but this project (and many more before it) have taught me that mistakes provide great opportunities to learn new skills and problem solve. Some of my greatest projects turned out the way they did because they didn't end up going exactly as I planned.
If you want to see the full step-by-step process of how I made these tables, head over to my Instagram page and check out my story highlight.
Hit the follow button if you want to see more amazing projects and tips on how to do them yourself!


Materials Required for 2 bedside tables:
1) 3/4" (1) Plywood (one sheet is enough for 2 tables)
2) 2X6 (1)
3) Pocket hole screws (40)
4) 2" Wood screws for the legs (6)
5) 3/4" Wood screws for the drawer rails (4)
6) Pack of 3/4"nails to attach 1/4" plywood to bottom of drawer and back of outer box
7) Drawer pulls (2)
8) Glue
9) Edge banding/ cutter
10) Clamps
The following instructions are for one bedside table. If you make 2 tables, make sure to double the cuts.
Cut List :
Outer box:
3/4" Plywood
(2) 20"x 14 1/2"
(2) 7" x 14 1/2"
1/4" Plywood:
8 1/2" x 19 3/4"
Drawer:
3/4" Plywood
(2) 6" x 13 1/2"
(2) 6" x 16 1/2"
(1) 18 1/8" x 6 7/8"
1/4" Plywood:
13 1/2" X 18"
Rails:
1/2" Plywood
(2) 1" X 13 3/4"
Legs:
Cut one 2"x 6" into three 1 1/2" strips.
(2) 24" x 1 1/2"
(2) 11 1/2 x 1 1/2"
Tools Required:
1) Drill
2) Drill bits
5) Table Saw
6) Orbital Sander
7) Mitre Saw
Follow the instructions outlined in the video below:


Comments